Last updated: November 18, 2026
Quick answer: drain the bottom plug, dry the reservoir above the pump, and store the unit open with silica gel packs; if you rush it in 10 minutes, stale odor can show up after 30 to 90 days. This guide explains How to Drain and Store a Portable Ice Maker Without Mildew for long-term appliance storage, especially when a bottom drain plug does not clear the hidden moisture trapped inside.
Key takeaways
- A bottom drain plug is not enough on its own if water sits in the internal reservoir above the pump.
- Drying needs both airflow and time; a closed cabinet after 10 minutes is a recipe for stale odor.
- Silica gel packs help hold down residual reservoir moisture during storage.
- The condenser core and other metal parts should be left dry, not wiped so hard that moisture is pushed deeper.
- If the machine already has black mold, this guide is not the fix; that needs a separate cleaning process.
How do you drain a portable ice maker without mildew?
Drain it by unplugging the machine, emptying the bottom drain plug, and then drying the hidden water that remains in the reservoir and pump area. The bottom plug gets the easy water out, but mildew starts when a few tablespoons stay trapped inside for days or weeks.
Use the drain plug first, then tilt the machine only as far as the maker’s manual allows so water can move toward the drain opening. Do not shake the unit hard or flip it on its side like a bucket, because that can send water into places that are harder to dry, including the condenser core housing and electrical spaces.
A plain wipe-down is not enough if the machine has a low spot that holds residual reservoir moisture. The goal is to leave the inside dry enough that no damp film stays on plastic, tubing, or the bin area after storage. For long-term appliance storage, that matters more than making the outside look clean. See the EPA’s mold guidance and the CDC’s mold page for the general principle that moisture control is the key.
The EPA’s mold guidance is clear that moisture control is what stops mold growth; see the EPA’s mold and moisture page for the general principle. The CDC gives the same basic warning on keeping indoor surfaces dry, which applies here because a portable ice maker is just a small damp box when it is packed away.
https://www.epa.gov/mold
https://www.cdc.gov/mold/
What tools do I need before storage?
You need a towel, a dry cloth, a small container for drained water, and silica gel packs. Those four items cover the entire job for most portable units, and none of them costs much compared with replacing a machine that smells musty after 3 months in storage.
A soft towel catches runoff at the bottom drain plug. A dry cloth handles the bin, side walls, and outside shell. The container keeps the sink or floor from getting wet while you drain the unit, which matters more if the ice maker sits on a counter near an outlet strip or a finished floor.
Silica gel packs are the useful extra here. Put a few inside the open bin area after the machine is dry so they can absorb leftover humidity during storage. Do not use anything that sheds dust or fibers into the interior, and do not seal the unit while the inside still feels cool and damp.
If the owner’s manual names a specific drying mode, use that too. Some countertop models have a self-clean cycle or a drain routine, but the key point stays the same: remove standing water first, then reduce leftover moisture before storing it for more than a week. For related cleaning steps, see our portable ice maker cleaning guide and how to remove odor from appliances.
How do you dry the inside completely?
Because the drain plug only handles part of the water, you dry the inside completely by leaving the lid or top open, wiping visible water, and giving the machine time to air out before you close it up. This is one of the steps that helps prevent a stale smell from showing up after a 2-week vacation or a full season off.
Start with a dry cloth in the ice basket, reservoir edges, and any flat plastic surface you can reach without taking the machine apart. Then let the unit sit open in a dry room so air can reach the reservoir area above the pump. If the room itself is damp, the drying time stretches, and that matters more than speed.
Specifically, pay attention to the condenser core area if it is reachable from the exterior vents. Do not force anything into the vents, and do not spray cleaner into openings. Airflow is the safer move. A fan in the room can help move dry air across the open top, but the fan should not blow dust into the machine.
This is also the point where many people get impatient and put the ice maker into a box too soon. That mistake traps residual reservoir moisture, and a mild smell can turn into a strong musty odor by the time you bring the unit back out. If the interior still feels cool or smells wet, it is not ready. For extra background on moisture control, the EPA and CDC both emphasize dry conditions.
What is the safest storage setup for winter?
A practical winter storage setup is a dry, open interior, a closed exterior, and a place that stays above freezing if possible. That setup keeps moisture out of the plastic shell and helps avoid the kind of hidden dampness that creates mildew in 30 to 90 days.
Do not pack the ice maker tightly in a plastic bag unless the inside is fully dry and you have added silica gel packs. A sealed bag around a damp appliance traps humidity. That is often the quickest route to a musty smell, even if the outside of the machine looks spotless.
If the unit will sit in a garage, basement, or utility room, raise it off the floor on a shelf or platform. That keeps it away from floor moisture and accidental splashes. Leave the drain plug closed only after the unit is fully dry, since an open plug can let in dust or insects while still letting air circulate where needed.
This is also the time to store the cord neatly, not wrapped so tightly that it bends the plug or strains the jacket. A loose coil around the base is better than a hard twist. Long-term appliance storage is simple when the machine is dry; it is frustrating when the cord is damaged because the unit was packed in a hurry. For broader appliance storage advice, see our winter appliance storage tips.
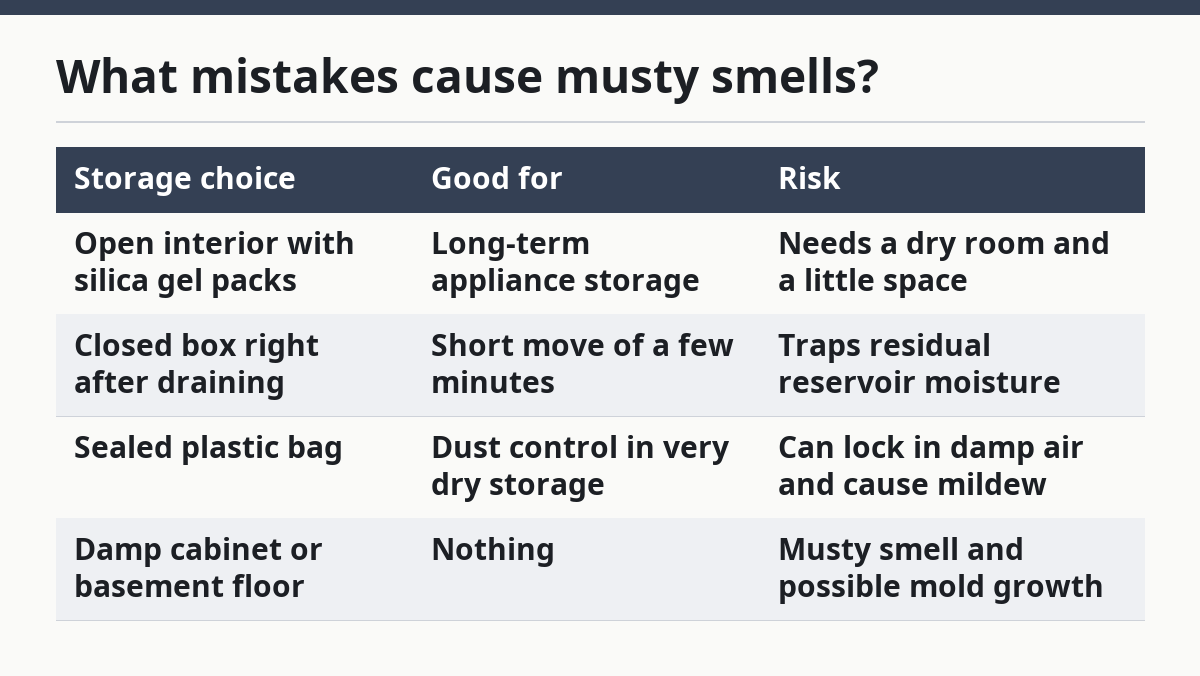
What mistakes cause musty smells?
The biggest mistake is relying on the bottom drain plug alone. That leaves water in the hidden reservoir above the pump, and that leftover water is what feeds mildew, not the puddle you can see on the counter.
A second mistake is sealing the unit in a box or bag before it is dry. That traps humidity in a small space and makes the machine smell stale in a short time. A third mistake is storing it with the bin full of dust, old ice chips, or dirty water film, because that residue adds odor even if the machine was drained correctly.
Here is a simple comparison of storage choices:
| Storage choice | Good for | Risk |
|---|---|---|
| Open interior with silica gel packs | Long-term appliance storage | Needs a dry room and a little space |
| Closed box right after draining | Short move of a few minutes | Traps residual reservoir moisture |
| Sealed plastic bag | Dust control in very dry storage | Can lock in damp air and cause mildew |
| Damp cabinet or basement floor | Nothing | Musty smell and possible mold growth |
If the machine already smells like mildew, stop and clean it before storage. Storage does not fix an active odor source. And if you are dealing with black mold, that is a different job from drying out a clean machine after seasonal use. For that cleanup, our mold removal guide for appliances is the better next step.
Which parts need the most attention?
The reservoir above the pump, the ice basket, and the vented side around the condenser core need the most attention. These are the places where water hides, air slows down, and mildew gets a foothold after storage.
The reservoir is the main trouble spot because it can hold moisture that the bottom drain plug never reaches. The basket is next because it collects meltwater and splashes. The exterior vents matter because dust plus dampness makes a grime layer that can smell bad even when the machine is technically dry.
Wipe the basket and inner walls with a clean dry cloth, then let them sit open for another stretch of time before storage. If you are unsure whether the inside is dry enough, wait longer. A few extra hours costs nothing; a mildew smell can take a long time to clear.
This is the point where a simple rule helps: if the machine would feel okay to put away in a kitchen cabinet but not okay to leave inside a cardboard box for a month, it is still too wet. Give the inside one more drying pass and add fresh silica gel packs before the final close-up. For a related checklist, see portable ice maker troubleshooting.
FAQ
How do you dry the inside of a portable ice maker completely?
You dry the inside completely by draining the bottom plug, wiping visible water, and leaving the machine open until the reservoir and bin no longer feel cool or damp. Silica gel packs help during storage, but they do not replace airflow and time. If the room is humid, drying takes longer, so do not rush it.
Can you store a portable ice maker in an unheated garage?
You can store one in an unheated garage only if it is fully dry and protected from floor moisture, dust, and pests. Cold air by itself is not the main problem; trapped water is. If the garage gets damp or the floor sweats, that raises the risk of mildew, so a shelf is safer than the concrete floor.
How long should a portable ice maker sit open before storage?
It should sit open long enough that the interior no longer feels cool, wet, or sticky to the touch. There is no honest one-size-fits-all time because room humidity changes the result. The safe test is the dry feel of the reservoir, bin, and vents, not the clock alone.
Do silica gel packs really help?
Silica gel packs help by absorbing leftover humidity inside the storage space. They work best after the machine has already been drained and dried, not as a fix for standing water. Put them inside the open bin or storage area, then keep the machine in a dry place so the packs are not fighting room moisture all by themselves.
Drafted with AI; not yet reviewed by a person.