Last updated: November 15, 2026
Portable ice maker cleaning and descaling is the routine that keeps the reservoir, evaporator fingers, and ice path free of slime, scale, and odor. Quick answer: plan on a basic wipe-and-rinse after each use, and use a deeper clean when buildup appears; a full deep clean can take about 30 minutes. The Portable Ice Maker Cleaning and Descaling maintenance is simple: empty the machine, wash the removable parts, descale the water path, then sanitize the food-contact surfaces before the next batch of ice. For related upkeep, see portable ice maker maintenance, ice maker descaling guide, and how to clean an ice maker.
Key takeaways
- Clean the machine on a regular cycle, not only when the ice tastes off.
- Descaling removes mineral scale; sanitizing handles germs. They are not the same step.
- The reservoir, evaporator fingers, and drain plug need attention every time.
- Use one cleaner for descaling and a separate sanitizing agent if the manual calls for both.
- Skip soap in the water reservoir unless the manufacturer specifically allows it.
What does this maintenance actually do?
Portable ice maker maintenance keeps scale from building on the evaporator fingers and keeps the reservoir from turning into a stagnant water pocket. That matters because scale changes how water freezes, and residue can leave the ice cloudy or off-smelling. For a countertop ice machine maintenance routine, the goal is not polish; it is clean water flow and a clean ice path. NSF notes that food-contact equipment should be cleaned and sanitized on the schedule the manufacturer specifies, not just when it looks dirty. NSF food equipment sanitization guidance
A generic wipe-down is not enough. A portable ice maker has narrow parts that trap minerals and film, especially around the reservoir, drain plug, and the metal fingers that shape the cubes. If those parts are left dirty for weeks, the machine can still run and still make ice, but the ice often looks worse and the interior takes longer to clean.
This is also why cleaning and descaling are separate jobs. Descaling removes hard-water deposits. Sanitizing reduces the microbes left behind after the machine is washed and rinsed. If a guide treats them as the same thing, it may leave the reader with half the maintenance; if the model is unclear, a qualified technician or the manufacturer can confirm the right sequence. CDC food safety basics
The simplest way to think about it is this: cleaning removes dirt, descaling removes mineral buildup, and sanitizing is the last food-safety step. A countertop ice machine maintenance routine should cover all three when the manual calls for them. A machine with a removable basket and a drain plug is easier to keep in shape than one with tight corners and no easy drain path.
How often should you clean it?
You should clean it before buildup becomes visible, and you should descale it as soon as scale starts to appear on the metal parts or inside the reservoir. That timing depends on use and on how hard the water is, so a fixed calendar rule can mislead the reader. Hard water can push descaling to the front of the schedule, while light use can stretch the interval.
A heavy-use portable ice maker in a kitchen or break room needs more attention than one that runs once a week. If the machine sits with water in the reservoir for long stretches, the drain plug and tank walls need more frequent washing. If the machine makes cloudy ice, leaves grit, or smells stale, the maintenance is overdue even if the outside looks clean.
The manual usually wins here. Some brands call for a full clean after a set number of cycles, while others separate daily wipe-downs from deeper descaling. A countertop ice machine cleaning routine that ignores the manual risks using the wrong cleaning agent or leaving residue in the water path.
A useful habit is to split the task into three levels. Wipe the exterior and basket often. Wash the reservoir and removable parts on a regular schedule. Reserve descaling and sanitizing for the deeper cycle. That keeps the machine from drifting into the kind of buildup that takes 30 minutes to undo later.
How do you clean a countertop ice machine?
You clean a countertop ice machine by draining it, washing the removable parts, cleaning the reservoir and evaporator fingers, then rinsing and drying the machine before refilling it. That sequence matters because cleaning in the wrong order just spreads residue around.
-
Unplug the machine and let the ice melt or remove it. Safety comes first, and a dry basket is easier to handle than a half-frozen one. A unplugged machine also keeps the control panel and pump from running while you work.
-
Open the drain plug and empty the reservoir. Many portable ice makers have a drain plug near the base, and this is often the fastest way to clear old water and loose debris. Let the water run out fully so the next step starts on an empty tank.
-
Remove the basket and any washable parts. Lift out the ice basket, scoop, or tray if the model includes them. These parts can hold the first layer of residue, and washing them separately helps prevent that grime from dropping back into the reservoir.
-
Wash the removable parts with warm water and a mild cleaner if the manual allows it. Use a soft cloth or sponge, not a scrub pad that can scratch plastic. Scratches give mineral film and residue more places to cling.
-
Wipe the reservoir, lid, and evaporator fingers with the recommended cleaner. The evaporator fingers are the metal parts that shape the ice, and they need careful wiping because buildup there can distort the cubes. A thin cloth wrapped around a finger or a soft brush works better than a rough pad.
-
Rinse with clean water until no cleaner remains. Leftover cleaner can change the taste of the next batch of ice. A second rinse is worth the extra minute if the first pass leaves any smell or foam.
-
Dry the interior and replace the drain plug. Air-drying reduces the chance of leftover moisture sitting in the tank. If the drain plug is not seated well, the machine will not be ready to refill.
-
Refill with fresh water and run one cycle if the manual calls for it. Some manuals ask for a rinse cycle after cleaning, and that cycle helps clear any last trace of cleaner before the machine returns to use.
The main cost of skipping any of these steps is hidden residue. A machine can look clean on the outside and still carry film in the reservoir or on the evaporator fingers. A shorter wipe-only routine saves time once, then turns into a deeper cleanup later.
What is the right descaling sequence?
The right descaling sequence is to empty the machine, circulate the descaling solution through the water path if the manual allows that, let it sit for the stated time, then flush the machine with clean water until the solution is gone. Descaling is about dissolving mineral scale, not scrubbing it off by force.
A portable ice maker often uses a citric-acid-based cleaner or a manufacturer-approved descaler. Some manuals call for vinegar-like cleaners; others do not. The safer rule is to use the cleaner named in the manual and follow the contact time it gives. If the manual says not to use a certain acid, do not improvise with a kitchen substitute.
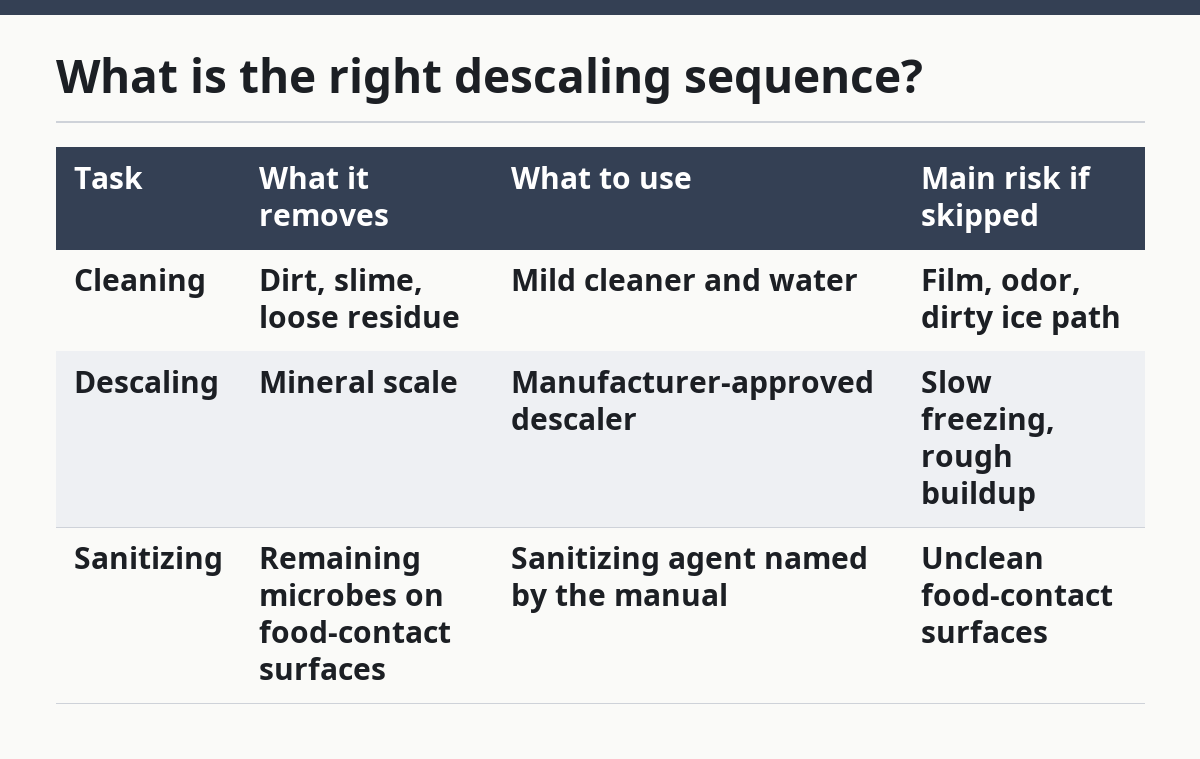
A comparison helps here:
| Task | What it removes | What to use | Main risk if skipped |
|---|---|---|---|
| Cleaning | Dirt, slime, loose residue | Mild cleaner and water | Film, odor, dirty ice path |
| Descaling | Mineral scale | Manufacturer-approved descaler | Slow freezing, rough buildup |
| Sanitizing | Remaining microbes on food-contact surfaces | Sanitizing agent named by the manual | Unclean food-contact surfaces |
The biggest mistake is treating descaler like a soap. It is not for foaming up the machine or for long soaking without direction. Too much product, too little rinse, or the wrong contact time can leave residue that affects taste and makes the next cycle unpleasant.
If the machine has a pump path or a recirculation feature, the descaling solution must reach that path too. That is where scale often hides, and the user who only wipes the visible tank misses part of the problem. A solid descaling cycle reaches the reservoir, the lines, and the evaporator area in one pass.
How do you sanitize it after cleaning?
You sanitize it after cleaning by using a food-safe sanitizing agent approved by the manual and giving it enough contact time before the final rinse or dry-down. Sanitizing is the step that follows washing and descaling, not the step that replaces them.
This is where readers often get the order wrong. If the machine still has scale or visible residue, sanitizer will not fix that. The surface has to be clean first, or the sanitizing agent cannot do its job well. That is why the guide to how to sanitize countertop ice maker maintenance usually starts with a wash, then moves to sanitizing.
Use the sanitizing agent the manufacturer recommends. Some manuals call for a diluted sanitizer; some specify a brand or a type of solution; some say to avoid certain chemicals on plastic parts. The important point is that food-contact surfaces in the ice maker need a product intended for that use, not a random household cleaner.
After sanitizing, rinse or dry the machine exactly as the manual directs. A sanitizing step that leaves a strong smell or taste is not finished. The reservoir, the ice basket, and the evaporator fingers should be free of residue before the machine goes back into service.
A full sanitize cycle is not needed for every quick wipe, but it is the right end point after a deep clean or descaling. That extra step matters most in a machine that stores water between uses, because standing water is the part of the design that needs the most discipline.
Which mistakes cause the most trouble?
The most common mistakes are using the wrong cleaner, forgetting the drain plug, and skipping the rinse after descaling. Each one costs time later, because residue, smell, or scale comes back fast.
Using a harsh scrub pad can scratch plastic parts. Scratches trap buildup, and once that starts, every cleaning takes longer. A soft cloth does the same job with less damage, and it keeps the reservoir and lid smoother.
Leaving water in the tank is another avoidable error. Standing water makes the next cleaning harder, especially around the drain plug and lower reservoir corners. Emptying the machine fully before and after the cycle keeps that problem from growing.
Some readers also clean only the visible parts and ignore the evaporator fingers. That saves 2 minutes at the sink and creates a much bigger problem later, because those fingers directly affect the ice shape. If the fingers are coated, the cubes are often the first clue.
The last mistake is mixing products. Descaler, sanitizer, and soap are not the same thing, and combining them can leave residue or make the rinse harder. A simple one-product-at-a-time routine is safer and easier to repeat.
When should you stop and check the manual?
You should stop and check the manual whenever the cleaner type, contact time, or rinse step is unclear. Portable ice makers vary enough that a method that works on one model can be wrong for another.
That matters most for the reservoir, drain plug, and evaporator fingers. Some machines have removable parts that can be washed separately; others do not. Some allow a sanitizer after descaling; others want only a water flush. If the manual gives a model-specific sequence, follow that sequence even if a generic guide looks shorter.
This is also the point where many people try to fix unrelated machine problems with cleaning alone. If the ice maker has a mechanical fault, a pump issue, or a sensor problem, no amount of descaling will solve it. Cleaning can remove the maintenance problem; it cannot repair broken hardware.
The safest rule is simple: if the machine uses a specific cleaner, a specific cycle, or a specific rinse order, use that. A countertop ice machine descaling manual exists for a reason, and it is the best source for model-specific steps. If the manual is missing, the next best move is to identify the exact model before choosing a cleaner.
What is the easiest way to clean a countertop ice maker?
The easiest way to clean a countertop ice maker is to drain it, wipe the reservoir and removable parts with a soft cloth, rinse well, and dry it before refilling. That basic routine is quick and works best when the machine does not have heavy scale. If buildup is already visible, add a full descaling step before the final rinse.
Can you use soap to clean a portable ice maker?
You can use soap only if the manual says the part is washable with soap and water. Soap left in the reservoir can affect taste and create extra rinsing work, so it is not the best default choice for food-contact areas. A manufacturer-approved cleaner or sanitizer is usually the safer option for the interior.
What is the easiest way to clean a countertop ice maker?
The easiest way is to unplug the unit, empty the reservoir through the drain plug, wash the removable parts, wipe the evaporator fingers, rinse, and dry. That routine fits most portable ice maker cleaning steps without adding special tools. If scale is present, the easy routine becomes incomplete unless descaling is added.
Can you use soap to clean a portable ice maker?
Soap is a poor default for the inside of a portable ice maker unless the manual explicitly allows it. Residue can stay in the reservoir and affect the next batch of ice, which means extra rinse cycles to remove it. A food-safe cleaner, descaler, or sanitizer named by the manufacturer is usually the better choice for the interior.
Drafted with AI; not yet reviewed by a person.

One thought on “Portable Ice Maker Cleaning and Descaling”